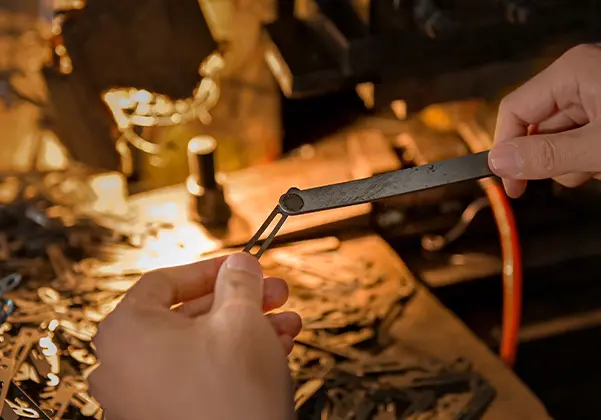
Making a high-quality folding knife is no simple task. It’s a meticulous process that involves precision, skill, and advanced technology at every step.
From crafting the blade and handle to assembling the final product, every detail matters to ensure durability, functionality, and safety.
Whether you’re curious about the craftsmanship behind folding knives or want to understand how they’re made to meet strict standards, this overview provides a step-by-step look at the journey from raw materials to a finished, reliable tool.
Let’s dive into what it takes to create a folding knife built to last.
Cuchilla
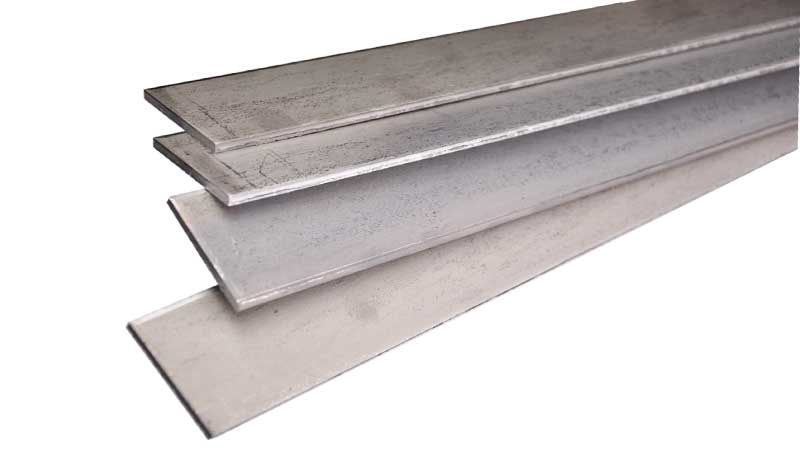
To cut blade materials accurately, we use special machines like wire cutters or laser cutters. For example, an IPG fiber laser cutter can cut with very high accuracy (as precise as ±0.05mm). We protect the cutting area with nitrogen gas to keep it from rusting or turning black.
After cutting, we randomly check the material’s grain structure (using a test called ASTM E112) to make sure there are no hidden defects inside the steel. It’s important that each cut follows the nesting diagram exactly, so the holes and layers match up properly when we weld them together later.
Wire Cutting / Laser Cutting
Annealing is a heat treatment process that makes metal softer and easier to work with. The method depends on the type of steel. For example:
- For high-carbon steel like D2, we use vacuum annealing at 780 Celsius. This makes the steel soft enough (below HRC20 hardness) to shape or machine easily.
- For stainless steel like 440C, we use a controlled atmosphere at 850 Celsius to prevent damage on the surface (called decarburization).
We also use accurate temperature control tools to make sure the heat is even, which prevents the steel from becoming weak or inconsistent.
Annealing
Annealing is a heat treatment process used to make steel softer and easier to shape or machine. The exact process depends on the type of steel we are working with.
Different steels need different temperatures and environments during heating to get the best results.
For high-carbon steel, like D2, we use a method called vacuum annealing. This is done at a high temperature of 780 Celsius inside a sealed vacuum chamber, which helps protect the steel from reacting with air. The goal is to lower the steel’s hardness to below HRC20, which makes it easier to cut, drill, or grind in the next steps.
For stainless steel, such as 440C, we use controlled atmosphere annealing. This is done at 850 Celsius, but instead of using a vacuum, we heat the steel in a special gas environment that protects the surface. This prevents a problem called decarburization, which is when the surface of the steel loses carbon and becomes weak or brittle.
It’s very important to monitor the temperature carefully throughout the annealing process. If the temperature goes too high or too low, the steel may become uneven or have weak spots. That’s why we use high-precision temperature control equipment.
These tools help keep the heating process stable and consistent, which improves the overall quality of the steel.
Alisado
After cutting and heating, metal can bend or warp. Straightening fixes this. We adjust machines based on the thickness of the material to make sure the blade is flat.
Fully automatic hydraulic straightening machines (with accuracy of ±0.02mm) are used instead of manual labor to ensure precision.
We also keep records of every batch so we can track quality later.
Deburring
When metal is cut, it often leaves behind tiny sharp edges or burrs. These burrs need to be removed before we can do more polishing or grinding.
We use machines to do this deburring process quickly, safely, and consistently. This step helps prepare the blade for a smooth finish and prevents injury during handling.
If you break a plastic toy and the edge is sharp, you would sand it smooth. Deburring does the same thing for metal edges.
Surface Grinding
Surface grinding is all about making both sides of the blade flat and even. This ensures the blade meets its required thickness and stays stable during later processes.
We use a double-sided surface grinding machine fitted with #80 grit wheels, which helps us grind both sides at the same time.
The goal is to keep the two surfaces parallel, with a maximum difference of just 0.03mm. Regular maintenance is key—grinding wheels wear down over time, and if we don’t check them often, the quality of the finish can suffer.
A good grind means fewer problems later, especially during heat treatment or sharpening.
CNC Machining of Bearing Slots & Chamfering of Pivot Holes
In this step, we use high-precision CNC machines to shape the bearing slots and smooth out the pivot holes. These holes are important for how the blade will rotate or move in its final use.
To avoid sharp edges, we add a small bevel (called a chamfer) on both sides, usually at C0.5.
We use 5-axis CNC machines that allow us to perform all these tasks—drilling, chamfering, and shaping—in one single setup. This saves time and keeps the accuracy very high, within ±0.01mm.
After the first part is made, we do a first-article inspection to make sure everything is correct. Then we continue to monitor parts during production. Getting the shape and hole placement exactly right means the blade will fit perfectly into its assembly and function smoothly.
Pivot Hole Honing
After the pivot holes are drilled and chamfered, we fine-tune them using a process called honing.
This step ensures the inside surface of the hole is extremely smooth and meets the required size with high accuracy.
We use Sunnen honing machines for this, which are known for their precision.
The goal is to achieve a surface roughness of Ra ≤ 0.4μm, which is very smooth to the touch.
This helps reduce friction when the blade moves or rotates in its final use. One important detail during honing is the coolant temperature. If it gets too warm or too cold, the size of the hole could change slightly, and the finish might not be consistent.
Honing may sound like a small step, but it makes a big difference in how smoothly and reliably the blade performs.
CNC Edge Milling
Edge milling is where the blade begins to take its final shape. Using CNC machines, we cut the blade’s edge according to a predefined nesting diagram, which shows the best layout for cutting multiple parts from one sheet of material.
This process ensures that each blade is formed accurately.
After cutting, we carry out a tempering process at a low temperature (200 Celsius) for two hours. This step helps reduce internal stress caused by machining, making the blade more stable and less likely to warp later on.
Once the tempering is done, we run stress tests to confirm that the blade remains stable and within quality standards.
Edge milling isn’t just about shaping the blade—it’s about preparing it to stay strong and reliable under real-world use. If skipped or done incorrectly, the blade could fail later, even if it looks fine at first.
Desengrasar
After CNC machining, the blade still has oil and grease on its surface—leftover from cutting tools and machines.
These residues can interfere with the next steps in production, such as heat treatment or coating.
That’s why we use ultrasonic cleaning to remove them completely. This cleaning method uses high-frequency sound waves in a liquid bath to lift off dirt and oil from even the smallest corners and surfaces.
It’s more thorough than manual cleaning and much faster. Once the parts are cleaned, they dry quickly and are ready for the next stage. Clean blades are not just about appearance; they ensure the surface is free of anything that could affect performance or cause defects down the line.
Think of it like washing vegetables before cooking—you don’t want anything unwanted getting in the way.
Bundling
Once the blades are clean and ready, they are bundled together in groups of ten. This makes it easier to move, track, and store them without mixing them up. We bundle the blades by passing steel wire through their pivot holes, securing them firmly but gently.
Using the pivot holes for bundling is efficient because it keeps the blades aligned and prevents damage. As part of our commitment to reducing waste, we use eco-friendly materials when possible for this process.
Proper bundling is more important than it may seem—it helps keep production organized and prevents any mix-ups or loss during storage or shipping.
It also adds a layer of protection, helping to avoid scratches or dents that could happen if blades were left loose in a box.
Tratamiento térmico
Heat treatment gives the blade its strength and final hardness. This step involves heating the steel in a vacuum (so there’s no air to cause oxidation), then cooling it quickly in oil—a method known as quenching.
For example, D2 steel is heated to 1040 Celsius, then cooled, and tempered three times at 520 Celsius to balance hardness and toughness.
After heat treatment, we test the blade’s hardness using Rockwell testers to ensure it meets the required HRC level.
We also check the steel’s internal structure under a microscope to look for proper martensite formation, which confirms a successful treatment. Every detail from time, temperature, cooling rate is recorded for future reference.
This step turns soft steel into a durable blade that can handle real-world use without bending or breaking, making it one of the most critical parts of the process.
Oxide Layer Removal
During heat treatment, the metal forms a dark layer on the surface, known as an oxide layer.
This layer isn’t harmful, but it needs to be removed to prepare the blade for finishing and ensure it looks and performs well.
We use edge polishing and surface grinding to clean off this layer.
According to our process, we leave about 0.15mm of extra material on one side during cutting, which gives us room to grind and polish without affecting the final size. Polishing is done using machines that apply even pressure and motion, giving the surface a consistent, clean finish.
This isn’t just about making the blade look good; it helps with later steps like sharpening or coating, where a smooth surface is essential.
Removing the oxide layer is a small but important detail in achieving high blade quality.
Precise milling
In this step, we follow a specific guide called the water milling line, which helps us shape the blade’s edge to exactly 0.3mm in thickness.
This also includes forming the secondary bevel—the slanted surface that supports the cutting edge. To make sure the thickness stays accurate, we use automated monitoring systems that check measurements in real time. If the thickness varies too much, the blade could become weak or dull quickly.
This step is where the blade becomes sharp and functional, ready for final inspection or sharpening.
Precision matters here more than ever, as the smallest mistake can affect how well the blade performs. Done right, it results in a strong, sharp blade that cuts cleanly and lasts longer.
Bevel Polishing
Bevel polishing gives the blade a clean and smooth finish, especially along the angled edge. The goal here is to create a uniform polish that runs perpendicular to the length of the blade.
This step helps the blade not only look better but also perform better by reducing friction during use.
A consistent surface also ensures the coating adheres properly if a finish is added later.
To measure the polish quality, we use gloss meters. These devices check how much light reflects off the surface, which tells us if the finish meets our standard. We carefully monitor this during polishing to avoid under- or over-polishing.
A well-polished bevel doesn’t just look professional—it also contributes to the sharpness and longevity of the blade. This step is small, but it sets the foundation for a premium final product.
Finish
Finishing is one of the last and most important steps. It gives the blade its final appearance and also adds a layer of protection. The goal is to cover any marks left from earlier machining or polishing, which helps extend the blade’s working life. The finish also protects the blade from rust and wear.
Here’s what we do during this step:
- Follow all contract or client requirements to apply the right type of finish.
- Make sure there are no leftover lines or marks from earlier processes.
- Use the cross-cut adhesion test (ISO 2409) to check how well the coating sticks.
- Perform corrosion resistance testing to see if the finish holds up in harsh environments.
The finish isn’t just cosmetic. It plays a key role in how the blade performs over time, especially in demanding conditions.
Lock face grinding
Lock face grinding is a manual process done after assembly to adjust how the blade fits into the knife. Every knife might have slightly different tolerances, so this step allows us to fine-tune the lock mechanism to ensure it works smoothly and securely.
To make this task easier and more consistent:
- Skilled operators grind the lock face by hand, guided by how the knife feels and locks during testing.
- We use custom molds or templates to maintain the right angle and alignment.
- This reduces human error and improves efficiency.
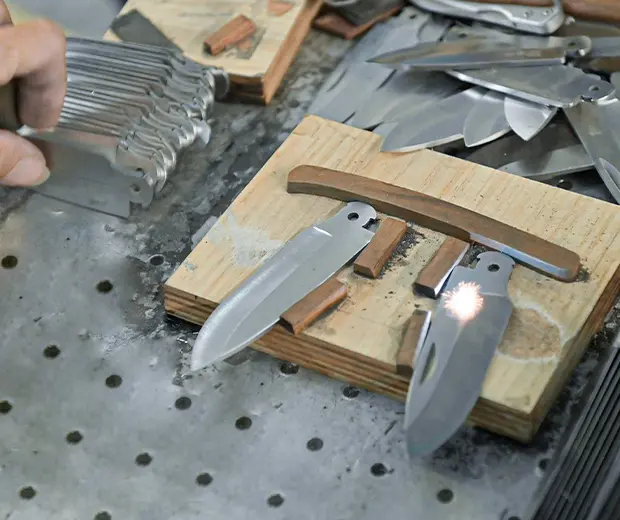
(Post-Assembly) Edge Sharpening
Once the knife is fully assembled, we sharpen the edge to make it functional. This is where the blade finally gets its cutting power. We aim for a sharpening angle of 15° to 20° on each side, which is ideal for balance between sharpness and strength.
We maintain a tight angle tolerance of ±0.5°, ensuring consistency across all blades.
Laser angle measuring tools are used to make sure the edge is sharpened at the correct angle every time.
Sharpening at this stage means the edge is freshly honed and ready for use. If done incorrectly, the blade may become either too dull or too weak, which affects both safety and performance.
(Post-Sharpening) Deburring
After sharpening, small metal burrs may form along the edge, tiny leftover fragments that can reduce cutting performance or even cause injury. Deburring is the process of gently removing these burrs to leave behind a clean, precise edge.
- We use leather wheels for this step. They’re soft enough not to harm the edge but strong enough to remove burrs.
- It’s important to avoid creating a “white edge,” which means the blade has been over-sharpened and lost its durability.
- For consistency and safety, we often use automated deburring machines. These reduce the chance of human error and ensure every blade gets the same treatment.
(Optional – Upon Client Request) Steel Inspection
Some clients want extra assurance that the blade steel meets strict quality standards. In those cases, we carry out a full steel inspection to verify the material.
A spectrometer is used to analyze the chemical makeup of the steel and ensure it matches AISI (American Iron and Steel Institute) standards.
We also perform regular internal and third-party audits on our inspection tools to make sure they’re calibrated correctly and delivering accurate results.
This inspection gives clients confidence that the steel used in their blades is exactly what was promised—strong, reliable, and consistent.
It’s not required for every project, but when requested, it adds another level of quality control to the production process.
Knife Handle Manufacturing Process
The knife handle plays a critical role in both the functionality and aesthetics of a knife. It needs to be strong, comfortable to hold, and precisely manufactured to fit the blade.
Depending on the design and end-use, knife handles can be made from metals such as titanium, aluminum, or stainless steel.
Each material brings its own benefits in terms of weight, durability, and corrosion resistance.
Drilling
Drilling is used to create holes in the metal handle for assembly—usually for rivets, screws, or pivots. This step must be precise to ensure proper alignment with the blade and other components.
- Secure multi-layer welding is necessary before or after drilling, especially if the handle is made of laminated or bonded materials.
- Every weld undergoes strength and consistency inspections, often using non-destructive testing methods like ultrasonic or dye penetrant testing.
- Proper hole placement and alignment ensure the knife will assemble cleanly without stress or distortion.
Estampado
Stamping is often used in high-volume production to shape handle components quickly and accurately. This process uses heavy-duty presses to cut and form metal sheets into handle shapes.
Key Characteristics of Stamping:
- Force: Presses apply from 10 to over 1,000 tons of pressure.
- Speed: Produces 20–60 parts per minute, ideal for mass production.
- Precision: Tolerances of ±0.01 mm, suitable for tight-fitting parts.
- Material Thickness: Can handle anything from 0.1 mm to over 10 mm.
- Eficiencia:
- Advanced mold design reduces material waste to less than 5%.
- Each mold can make thousands to millions of parts.
- Lower cost per part due to high volume and efficiency.
Stamping is ideal when manufacturing needs to scale up without sacrificing accuracy.
Wire Cutting / Laser Cutting (Alternative Methods)
For cutting handle profiles or internal structures, laser cutting is often preferred over traditional wire cutting, especially for metals like titanium.
- Fiber Laser Cutting Benefits:
- Precision of ±0.05 mm
- Less heat-affected zone, reducing warping and oxidation
- Better suited for delicate metals like titanium
- Nesting Diagrams: Used to optimize material usage and minimize scrap.
- Real-Time Monitoring: Integrated systems ensure consistent cut quality and allow adjustments mid-process if needed.
Laser cutting is faster, cleaner, and more material-efficient than older methods.
Alisado
After cutting or stamping, metal parts can bend or warp slightly. Straightening ensures every piece is perfectly flat and stress-free before moving to the next step.
- Four-hand rings are adjusted based on material thickness to begin the flattening.
- Use of fully automatic hydraulic straightening machines improves precision and speed.
- Laser leveling tools ensure that flatness meets exact standards.
- To relieve internal stress, a vibration aging treatment is applied after straightening.
- Final dimensional checks confirm that each piece is within acceptable tolerance.
This step ensures a stable foundation for handle assembly and prevents any warping during later processes like coating or finishing.
Dimensional Inspection
Accurate measurements are key to ensuring parts fit together during final assembly. A Coordinate Measuring Machine (CMM) is used to inspect critical dimensions, especially pivot holes with tight tolerances of ±0.01 mm.
These inspections verify if the part matches the original design.
- All inspection data is recorded and stored for traceability and quality control.
- Frequent calibration of CMM equipment ensures consistent accuracy.
Dimensional inspections help catch issues early, preventing delays or rework during assembly.
CNC Milling
CNC milling shapes the knife handle and key structural features. A 5-axis CNC machine, such as a Mazak system is used to complete complex geometries in a single setup.
- One-time clamping improves precision and reduces cumulative error.
- Tolerances are maintained within ±0.02 mm for surfaces, chamfers, and holes.
- A first-article inspection is required before mass production starts to confirm the setup is correct.
This integrated process shortens cycle time and improves machining accuracy.
Hole Drilling
Precision drilling is essential for the structural and functional integrity of knife handles. Special tooling is used that combines drilling, reaming, and chamfering in one operation.
- This reduces tool changes and keeps holes coaxial, meaning perfectly aligned.
- Automated inspection tools confirm hole size, roundness, and position.
Such a setup ensures tight tolerances are met consistently, even at high production volumes.
Chamfering
Chamfering removes sharp edges from drilled holes and enhances safety and assembly fit. A 2.5 mm drill bit is typically used to perform chamfering and burr removal in one step.
- After chamfering, a surface finish check ensures the edges meet design standards.
This step reduces injury risk and improves component fit during knife assembly.
Thread Tapping
Thread tapping prepares holes to accept screws or bolts during final assembly. Different types of taps are selected based on application:
| Tap Type | Speed | Características |
| Roll Tap | 160 rpm | No chips, increases thread strength (by 20%) |
| Spiral Tap | 300 rpm | High-speed cutting, uses micro-lubrication |
- Threads are checked with Go/No-Go gauges (ISO 724 standard).
- Lubrication is monitored closely to prevent thread damage or tool wear.
Thread quality directly affects the reliability of the assembled product.
Desengrasar
After CNC machining, any oil residue must be removed. Ultrasonic cleaning is used to thoroughly clean parts before further processing.
- This method removes residue even from tight corners or holes.
- Clean surfaces improve adhesion during coating and finishing steps.
Skipping this step could result in finish defects or poor coating durability.
Lockbar Cutting
Lockbars are a key part of the folding knife mechanism. For materials like titanium, precision cutting is critical.
- Cutting per nesting diagram helps minimize waste and optimize material use.
- Slow Wire EDM is used to prevent heat-related issues like micro-cracks.
- Post-cutting, each surface undergoes quality checks to confirm there are no hidden defects.
This process ensures durability and consistency in high-stress areas.
Detent Hole Drilling
Detent holes control the blade’s opening and closing feel. These holes must remain perfectly round and aligned even after heat treatment.
- Pre-machining leaves a 0.1 mm margin before heat treatment.
- After heat treatment, holes are honed to final size to compensate for thermal distortion.
- Internal stress checks are performed to prevent deformation.
Correct handling at this stage ensures a smooth, controlled knife action.
Finish
Final finishing treatments improve the knife’s look, feel, and durability. Each finish is selected based on performance and aesthetic goals.
Example Surface Treatments:
- Sandblasting (Al₂O₃, 120 mesh) followed by Anodizing for colored titanium finishes.
- PVD Coating (e.g., CrN) with high hardness (HV2000) and low friction (coefficient 0.3).
- Laser Texturing for grip enhancement:
- Patterns: Fish scale, honeycomb
- Depth: 0.1 – 0.3 mm
Eco-friendly Measures:
- Alkaline degreasers replace solvent-based cleaners.
- All treatments are RoHS/REACH compliant.
- Treatment parameters are logged by batch for traceability.
A high-quality finish improves both performance and customer perception of the final product.
Scale Materials (G10 / Micarta / PEI / Carbon Fiber, etc.)
Knife handle scales made from sheet materials such as G10, Micarta, PEI, and Carbon Fiber offer a balance of strength, durability, and aesthetics. These composite materials are lightweight, corrosion-resistant, and provide good grip performance under various conditions. Each material has unique properties:
| Material | Características principales |
| G10 | Glass-based epoxy laminate, water-resistant, textured finish |
| Micarta | Fabric-epoxy composite, grippy and natural feel when wet |
| Isla del Príncipe Eduardo (Ultem) | High-temp plastic, chemical-resistant, inherently antimicrobial |
| Fibra de carbon | Extremely strong and lightweight, elegant woven appearance |
Choosing the right material depends on the knife’s purpose—tactical, EDC, or premium collectible—balancing aesthetics with functionality.
Material Preparation
Before machining, composite sheets require precise conditioning to prevent structural issues later. Materials like G10 and Carbon Fiber must be pre-baked at 80 Celsius for 4 hours to remove internal moisture and prevent delamination during CNC cutting.
- Ultrasonic flaw detection is used to identify hidden voids or cracks.
- For G10 and Carbon Fiber, infrared moisture analysis ensures water content stays below 0.5%, reducing risk of warping.
- Visual and tactile inspections confirm the material surface is clean and defect-free.
These steps ensure the sheet material maintains its structural integrity during high-speed machining and thermal stress.
CNC Machining
CNC machining transforms flat sheets into ergonomic and functional knife handle scales. Using Hurco 5-axis machines, 3D milling creates complex surface contours such as finger grooves or wave grip textures. Maintaining a surface roughness Ra ≤ 1.6μm ensures a smooth yet grippy feel.
- For carbon fiber, cryogenic cooling with liquid nitrogen is applied to prevent resin from overheating and softening.
- Robotic polishing systems replace manual deburring to improve consistency.
- Resin thermal stability is carefully monitored to prevent deformation during cutting.
Advanced machining setups reduce tool wear and deliver repeatable quality for each part.
Semi-Finished Product Inspection
After machining, semi-finished handle components undergo multiple quality checks to verify structural performance.
- Interlaminar Shear Strength is tested per ASTM D2344, with carbon fiber materials needing to withstand ≥60 MPa.
- Damp-heat cycling tests simulate extreme conditions: 48 hours at 85 Celsius and 85% RH to ensure no warping or cracking.
- Inspection protocols are standardized at every stage to monitor yield rate and detect flaws early.
By performing these tests, manufacturers ensure that the handles are not only functional and attractive but also reliable under stress.
Drilling
Precision hole drilling is essential for assembling knife handles with liners, spacers, or hardware like pivots and screws. High-speed drilling is followed by a coaxiality check to verify the alignment of all through-holes. Misalignment can cause poor fit, uneven torque, or long-term durability issues.
Tools used are optimized for composite materials to prevent fraying or delamination at the hole edges.
Accurate drilling ensures that all fasteners fit snugly without stressing the material, preserving the strength of the handle under use.
Chamfering
Chamfering removes sharp or splintered edges from drilled holes, making the handle safer to touch and easier to assemble. A 2.5 mm drill bit is used to apply consistent edge chamfers and to eliminate burrs.
After chamfering, each hole is inspected to confirm that:
- No sharp edges remain
- No fibers are sticking out (especially in Micarta and Carbon Fiber)
- Surface integrity is maintained
This process also helps prevent damage to screws or tools during assembly, increasing overall product quality.
Surface Functional Treatment
Surface treatments enhance grip, safety, and aesthetics. The type of treatment depends on the base material:
- G10 / Micarta: Apply laser deep etching (0.5 mm) for texture, followed by silicone inlays with Shore A 50 hardness to improve anti-slip properties.
- Carbon Fiber: Maintain natural appearance by using 3K twill weave and applying a clear epoxy coating for grip and visual appeal.
- PEI (Ultem):Add a silver ion antimicrobial coating, compliant with ISO 22196, to inhibit bacterial growth.
Functional performance is tested after treatment to ensure surfaces meet slip-resistance and antimicrobial standards.
Backspacer
The backspacer is a structural and aesthetic component positioned between the two handle scales of a folding knife. It helps reinforce the handle, maintain rigidity, and improve balance.
Depending on the knife’s design and function, backspacers are made from a variety of metals:
| Material | Properties & Benefits |
| Titanio | Lightweight, corrosion-resistant, anodizable |
| Aluminio | Very light, easy to machine, affordable |
| Acero inoxidable | Strong, durable, high wear resistance |
Backspacers can also be decorative, offering customization through anodizing, engraving, or texturing. The material selection and finishing process must ensure structural reliability and a premium appearance.
Estampado
Stamping is used for shaping backspacer blanks before they undergo further processing. A multi-layer welding process may be used to bond different metal layers together—useful for strength or aesthetic contrast (e.g., layered titanium and steel).
- Pre-weld inspection ensures the weld sites are correctly aligned and clean.
- Weld strength must meet mechanical stress requirements to avoid delamination during use.
- Stamped parts are checked for warping and material uniformity before proceeding.
Stamping is ideal for medium to high-volume production, where consistent shapes are required with minimal material waste.
Wire Cutting / Laser Cutting
For high-precision blanks, wire EDM or fiber laser cutting is employed based on the material:
- Titanium or Stainless Steel: Fiber laser cutting is preferred due to its minimal heat-affected zone (HAZ), keeping thermal deformation low.
- Cutting Accuracy: Maintained at ±0.05mm
- Surface Finish: Roughness target of Ra ≤ 6.3μm
The process follows a nesting diagram, optimizing material usage and aligning part orientation with material grain for improved strength and finish consistency.
Surface Grinding
After cutting, backspacer blanks undergo surface grinding to reach the exact thickness required by the design. This is done using a double-sided surface grinder, such as the Okamoto ACC-SA, which ensures parallel surfaces with better efficiency than single-sided methods.
- Thickness Tolerance: Maintained at ±0.01mm
- Surface grinding improves fit between handle scales and ensures flatness, which is crucial for knife assembly.
- A surface finish inspection is performed to confirm it meets aesthetic and tactile requirements.
Dimensional Inspection
Precision is critical in backspacer production. Coordinate Measuring Machines (CMM) are used to inspect:
- Hole Pitch: Accuracy within ±0.02mm
- Flatness: Kept under 0.03mm
For titanium parts, a 100% inspection of α-phase content (using metallography methods) ensures thermal processes haven’t caused embrittlement. This prevents future failure due to cracking or brittleness. All inspection data is logged to ensure traceability and production consistency.
CNC Milling
Complex 3D contours like chamfered edges, grooved lines, or ergonomic arcs are created using 5-axis CNC machining. This allows precise shaping in a single clamping, which improves accuracy and reduces tolerance stack-up.
- Surface Roughness: Controlled at Ra ≤ 1.6μm
- First Article Inspection: Mandatory before batch production
The use of multi-axis milling enables creative freedom in backspacer design, supporting both function and visual appeal while ensuring production repeatability.
Drilling
Backspacers require through-holes to align with handle scales and fasteners. Precision drilling is carried out using high-speed CNC drills.
- A concentricity check is conducted immediately to ensure proper alignment.
- Poor alignment may affect the assembly or long-term performance of the knife.
Special drill bits optimized for titanium or stainless steel reduce burr formation and heat, maintaining part integrity.
Chamfering
Chamfering smooths the edges of drilled holes, both for safety and aesthetics. A ø2.5mm bit is used, often combined with ChamDrill tools (such as ISCAR ChamDrill) for speed and efficiency.
- Chamfer Size: Typically C0.3
- After chamfering, parts are inspected to ensure there are no sharp edges or fiber lifting (in laminated variants).
Consistent chamfering improves comfort in handling and reduces risk of hardware wear during assembly or daily use.
Desengrasar
To remove oils and residues after CNC machining, all backspacers go through ultrasonic cleaning:
- Cleaning Solution: Water-based, neutral pH, RoHS-compliant
- Ensures environmentally friendly and safe cleaning
- Titanium Parts: Undergo electrolytic polishing, removing oxide layers and reducing surface roughness to Ra ≤ 0.8μm
This stage prepares the surface for anodizing, coating, or assembly, ensuring long-term durability and clean bonding of finishes.
Finish
Final surface treatment enhances durability, grip, and appearance. Depending on the material and design intent, multiple finishing options are available:
| Finish Type | Descripción |
| Sandblasting + Anodizing | For titanium; provides matte texture and custom colors (e.g., blue, gray) |
| Micro-Arc Oxidation (MAO) | Forms hard ceramic-like coating (HV1500), insulating and wear-resistant |
| Laser Engraving | Deep engraving for logos or serials (0.05mm depth, permanent) |
| PTFE Coating | For stainless steel; reduces friction by 40%, adds corrosion protection |
Every treated backspacer undergoes abrasion and corrosion resistance tests to ensure it meets quality and functional standards. This guarantees performance in real-world use while allowing for artistic customization.
Composite Materials (G10 / Micarta / PEI / Carbon Fiber, etc.)
Composite materials such as G10, Micarta, PEI, and carbon fiber are widely used in high-performance applications due to their excellent strength-to-weight ratio, chemical resistance, and thermal stability.
Each type of composite offers specific benefits. G10 and Micarta are favored for their strong, textured surfaces ideal for grip-oriented components, while PEI (commonly known as Ultem) is prized for its transparency and ability to endure high temperatures.
Carbon fiber stands out with its exceptional rigidity and sleek appearance, making it a premium choice for structural or aesthetic parts.
Working with these materials requires precise control at every stage, as errors during machining or preparation can compromise performance or result in visual flaws such as delamination or fiber distortion.
Material Preparation
Before machining begins, composite materials must be prepared meticulously to prevent failures during processing.
Pre-baking the sheets at 80 Celsius for 4 hours is essential to remove residual moisture, which can lead to delamination or warping when exposed to CNC heat.
Ultrasonic flaw detection is performed to identify internal bubbles or cracks that could weaken the part. For moisture-sensitive materials like G10 and carbon fiber, infrared moisture detectors are used to verify that moisture content is below 0.5% before prepregs are cut.
These quality control measures ensure the raw material is structurally sound and stable enough to endure the stresses of high-speed machining. Careful tracking and documentation of each batch also support full traceability in the production chain.
CNC Milling
Machining composite materials requires high-speed CNC systems and specialized tools to maintain accuracy and surface quality without damaging the fibers or resins.
Using HSK holders and spindle speeds up to 20,000 rpm, machining centers can shape complex geometries while keeping vibrations low.
Carbon fiber components are milled dry using high-precision tools to avoid fraying or delamination, while robotic flexible polishing systems are deployed for deburring, applying consistent force under 5N to ensure uniformity without affecting material integrity.
Low-temperature or cryogenic cooling methods are often used to prevent resin overheating, which can lead to softening or deformation. This combination of advanced equipment and process control ensures that each part meets design specifications both structurally and cosmetically.
Semi-Finished Product Inspection
After milling, semi-finished parts undergo thorough inspections to verify that they meet required mechanical and environmental standards. Interlaminar shear strength is tested according to ASTM D2344 to confirm bonding quality within layers, especially for carbon fiber, which must exceed 60MPa.
The components also undergo a damp-heat cycle at 85 Celsius and 85% relative humidity for 48 hours, simulating harsh environmental conditions to check for warping or cracking. Any sign of failure leads to batch reevaluation or rejection.
All inspection results are documented and linked to specific production lots, ensuring traceability and accountability throughout the production cycle.
This step guarantees that only components meeting the highest quality criteria proceed to final processing.
Drilling
Drilling operations in composite materials must be executed with extreme precision to avoid issues such as fiber breakout, delamination, or resin cracking.
Through-hole drilling is carried out using optimized feeds and speeds, and specialized drill geometries are chosen to reduce mechanical stress on the composite structure.
Immediately after drilling, concentricity and dimensional alignment are inspected to ensure proper fit with corresponding mechanical components like screws or pins. Maintaining precise alignment is especially critical in multi-part assemblies where cumulative tolerance errors can lead to misfit or mechanical instability.
All drilled features are verified using digital measurement tools, and any deviations beyond tolerance trigger corrective actions.
Chamfering
Chamfering is essential for both safety and functionality, ensuring that edges are smooth, burr-free, and visually refined.
Using a ø2.5mm drill bit or polycrystalline diamond (PCD) tooling, sharp edges are beveled to a consistent C0.3 chamfer.
PCD tools are especially effective on abrasive materials like carbon fiber and G10, offering a tool life up to 10 times longer than conventional carbide bits.
After chamfering, the edges are inspected to confirm the absence of burrs or splinters, which could compromise safety or assembly. This process not only improves aesthetics and tactile comfort but also ensures compatibility with other mating components in the final assembly.
Surface Functional Enhancement
To enhance both functionality and appearance, composite surfaces are treated using specialized methods tailored to each material.
For G10, a laser-engraved grid pattern is applied with a depth of 0.2mm and a 1mm pitch, improving tactile grip without compromising structure.
Carbon fiber components may receive a 3D raised micro-texture via CNC micro-milling, adding visual depth and improved handling.
Additionally, carbon fiber parts often receive an anti-static coating that achieves surface resistance values between 10⁶ and 10⁹ ohms, compliant with ANSI/ESD S20.20 standards, making them suitable for electronics-related applications.
These enhancements are thoroughly inspected for uniformity and adhesion to ensure long-term performance in demanding environments.
Clip de bolsillo
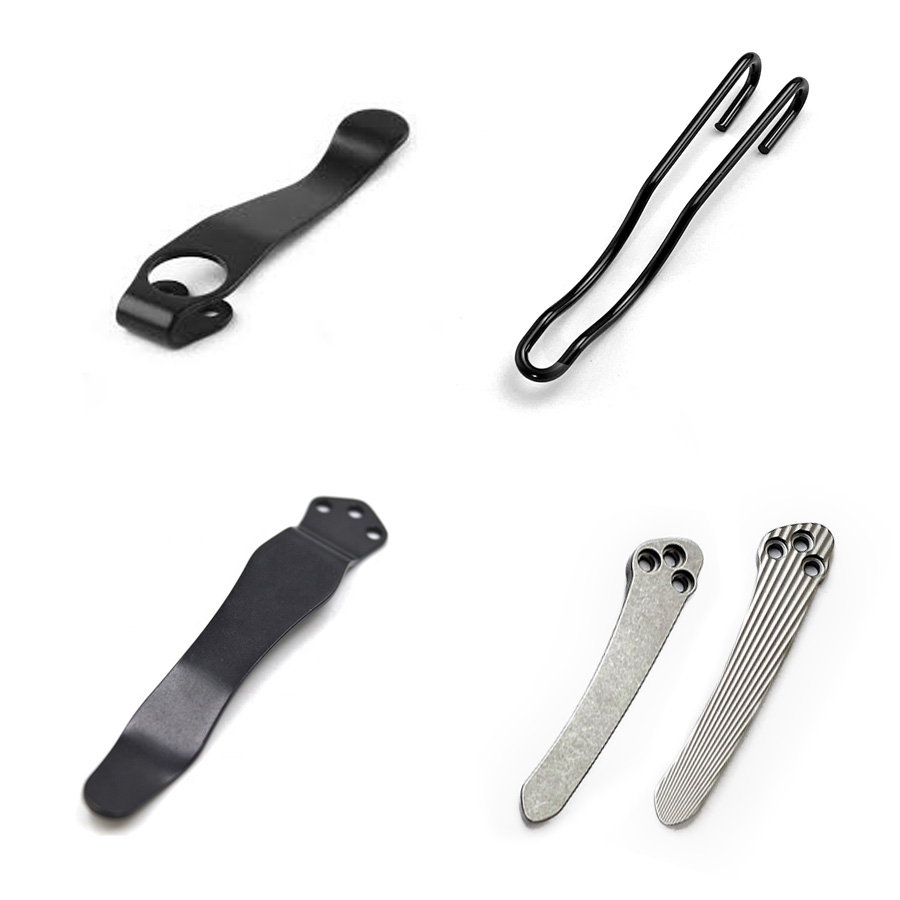
Titanium Material
Titanium is selected for its strength, corrosion resistance, and lightweight properties, making it ideal for pocket clips. The material is processed in sheets ranging from 0.8 mm to 1.5 mm thickness and must pass visual and dimensional inspections before use.
Estampado
- Multi-layer stamping is used for enhanced durability and elasticity.
- Pre-welding inspection ensures correct layer positioning and structural strength.
- Welding is performed precisely to avoid material distortion or weak joints.
Wire Cutting / Laser Cutting
Titanium sheets ranging from 0.8 mm to 1.5 mm thick are cut using an IPG fiber laser. The cutting follows a predefined nesting diagram to reduce material waste. The laser operates at a speed of 4 meters per minute and keeps the heat-affected zone to a maximum of 0.1 mm to preserve material properties.
After cutting, each piece is inspected to ensure the surface quality meets the standards required for CNC machining and final finishing processes.
Surface Grinding
Double-sided surface grinding is used to achieve precision thickness and flatness. A double-sided surface grinder, such as the Okamoto ACC-1224DX, is employed to grind both sides of the clip.
The target thickness tolerance is within ±0.01 mm, and flatness is maintained at or below 0.02 mm. After grinding, the surface roughness is checked to ensure it meets design standards. This process ensures the clip sits flush and securely against its mounting surface without warping or gaps.
CNC Milling
Five-axis CNC machining is used to shape the clip’s complex curves, such as ergonomic bends, in a single clamping setup. This method improves dimensional consistency and reduces alignment errors.
The surface roughness is kept at or below Ra 1.6 μm for a smooth, functional finish. Before full production, a first article inspection is carried out to confirm the initial piece meets all specifications. This helps ensure that the entire production batch maintains uniform quality and fit.
Semi-Finished Product Inspection
Each semi-finished pocket clip is tested for elasticity and long-term durability. The elasticity test involves bending the clip 90 degrees for 1,000 cycles. It must pass without cracking, in accordance with ASTM E290 standards.
All test results are recorded and stored for quality tracking and traceability. This inspection step ensures the clip will maintain its strength and flexibility during regular use.
Drilling
Precision drilling is carried out using an integrated tool like the Kennametal DF Drill, which performs drilling, reaming, and chamfering in one step. This reduces tool changes and increases accuracy.
The drilled holes are maintained within a tight tolerance of ±0.01 mm. After drilling, the holes undergo concentricity and dimensional inspection to ensure proper alignment for fasteners like screws or rivets. This guarantees the clip attaches securely and functions as intended.
Chamfering
Chamfering eliminates sharp edges and ensures comfort and safety during use:
- Tool: ø2.5 mm drill bit or Kennametal DF integrated tool
- Chamfer Spec: C0.3
- Post-process: Surface inspection to confirm no burrs or raised edges
This step is critical for preventing snags or skin contact issues.
Desengrasar
Eco-friendly degreasing is done post-machining:
- Cleaning Method:
- Ultrasonic cleaning using water-based degreaser (pH 7–8)
- Followed by vacuum drying
- Regulation Compliance:
- Fully REACH compliant
- Final Inspection:
- Ensures no water spots, oil residue, or fingerprint marks
The process improves coating adhesion and aesthetic appearance.
Stainless Steel Material

The parts are made from stainless steel, which is strong, corrosion-resistant, and ideal for long-lasting products.
Before manufacturing begins, the material is tested to make sure it meets the required standards. Only high-grade stainless steel is used, such as 304 stainless steel, which offers good strength and resists rusting even in tough conditions.
Mold Making
To shape the parts, a custom mold is created based on the product design. This mold is reusable and built to last up to 500,000 production cycles. Special design software like SolidWorks and AutoForm is used to simulate how the material behaves during stamping, especially how it might bend back after being pressed (this is called springback).
By predicting and controlling this, the mold lasts longer and the parts come out with more accuracy. Strength tests are also done during the mold design stage to avoid future problems.
Estampado
Stamping is the main process used to shape the stainless steel. Automated machines apply between 10 and over 1,000 tons of force to form the parts, making 20 to 60 parts every minute.
These machines are highly accurate, producing shapes with a size variation of only ±0.01 mm.
The material can be as thin as 0.1 mm or thicker than 10 mm. The molds are designed to waste less than 5% of the material, which helps lower costs and improves efficiency. One mold can be used to make thousands or even millions of parts, making this process ideal for large-scale production.
Wire Cutting (Alternative Process)
In some cases, wire cutting or laser cutting is used instead of stamping. The material, 304 stainless steel, is checked using magnetic testing to make sure it’s genuine—this type of steel should have very low magnetism.
Multiple layers are welded together for extra strength. Laser cutting is done at a speed of 6 meters per minute, with a burr (sharp edge) height of no more than 0.02 mm.
High-precision servo stamping machines, such as the AIDA servo press, are then used to form the part with excellent accuracy (±0.01 mm) and built-in springback control.
Tapping
Tapping is the process of cutting threads inside holes so screws can be inserted. This is done at a speed of 160 revolutions per minute using special form taps, which don’t cut chips but instead press the threads into shape.
This method makes the threads about 30% stronger. After tapping, the part goes through vibratory deburring to remove any tiny burrs left on the surface.
Stamping/Forming
Once the mold is ready, the press machine settings are fine-tuned to match the product drawings. The forming process bends and shapes the stainless steel as required. After forming, the part is inspected to ensure the dimensions and shape are correct and meet the original design.
Tratamiento térmico
To improve hardness and durability, the parts are heat treated. This is done in a vacuum oven to prevent oxidation. The process includes heating the part to 1050 Celsius for solution treatment, then aging it at 480 Celsius.
This gives the part a final hardness of HRC45 ±1, making it strong and wear-resistant. The part is also tested with a salt spray for 96 hours to make sure it doesn’t rust easily.
Semi-Finished Product Inspection
Before finishing, the part goes through a fatigue test. This simulates regular use by opening and closing the clip 5,000 times. The test checks that there is no more than 0.1 mm of permanent bending or warping. The results are recorded and used to improve the product quality over time.
Liner Manufacturing Process
Mold Making
To begin the production process, a reusable mold is created based on the shape of the liner. This mold is used for stamping the metal parts. During the mold design stage, in-die induction heating is applied, which keeps the mold temperature consistent within ±5°C. This helps reduce stress on the metal during stamping.
Finite Element Analysis (FEA)—a computer simulation method—is also used to study how the mold will perform under pressure. This helps improve the mold’s strength and lifespan, meaning less maintenance is needed over time.
Estampado
The stamping process uses automated machines that apply pressure ranging from 10 to over 1,000 tons. These machines produce between 20 to 60 parts each minute. The stamped parts are made to exact measurements, with tolerances as small as ±0.01 mm.
This method can handle different material thicknesses from 0.1 mm up to over 10 mm. Thanks to smart mold designs, material waste is kept under 5%. One mold can produce thousands or even millions of pieces, making the process highly cost-effective and efficient.
Wire Cutting (Alternative)
As an alternative to stamping, wire cutting can be used. This involves cutting the material based on a predefined layout, often called a nesting diagram, and includes processes like skeletonizing—removing unnecessary parts. After cutting, the material goes through vibration aging treatment.
This process uses vibrations (50 Hz frequency and 2 mm amplitude) to relieve internal stress. Once stamping is complete, the shape and size are checked to ensure they meet the next processing steps.
Alisado
After stamping or cutting, the material is straightened to remove any bends. Operators adjust the machine based on the material’s thickness. A servo-hydraulic straightening machine is then used to automatically level the material.
This machine is accurate to within ±0.01 mm and uses a laser to detect flatness. After straightening, the product is inspected to confirm it meets quality standards.
Tapping
Tapping creates threads inside drilled holes so screws can fit. The holes are drilled at 160 rpm using special tools that combine drilling, reaming, and chamfering in one step. The final hole size is extremely precise (±0.01 mm) and chamfered at C0.2 to remove sharp edges.
For stainless steel liners, chipless taps are used to form the threads, which makes them 30% stronger.
A plant-based lubricant is applied to reduce oil residue, and the alignment of the thread is checked to ensure strength and accuracy.
Chamfering
Chamfering is done using a 2.5 mm drill bit to smooth out edges and remove any burrs left from previous steps.
This makes the surface safer and improves the overall appearance. After chamfering, the surface is inspected to make sure there are no sharp edges that could affect handling or performance.
Drilling
Through-hole drilling is done next. After drilling, both the hole diameter and depth are checked carefully to ensure they match the product design exactly.
Tratamiento térmico
Heat treatment improves the hardness and strength of the metal. For stainless steel, this includes heating to 1050°C, cooling it down to -80°C for 2 hours, and then reheating to 480°C. This results in a final hardness of HRC45 ±1.
For titanium alloy liners, a different method called beta-phase heat treatment is used. This process improves the balance between strength and toughness.
Once heat treatment is done, hardness and metal structure are inspected to ensure the material meets all required specifications.
Lockbar Cutting
The lockbar is cut using a high-precision laser called a picosecond laser. This type of laser cuts with extreme accuracy and doesn’t create a heat-affected zone, which can damage the material.
The slot width is controlled within ±0.02 mm. After cutting, the surface is inspected to ensure it is smooth and matches the design.
Detent Hole Drilling
The detent hole is processed with careful planning. Before final shaping, a small allowance of 0.05 mm is left. After heat treatment, Electrochemical Machining (ECM) is used to finish the hole very precisely (±0.005 mm). The position and size are then checked to confirm accuracy.
Surface Finish
The final finish must completely cover any marks from earlier machining steps. Common treatments include:
- Sandblasting with 80-mesh alumina to clean the surface
- Electrolytic polishing for a smooth finish with a surface roughness of Ra ≤ 0.4 μm
- DLC coating (Diamond-Like Carbon) for high wear resistance, with a hardness of HV3000 and a low friction level of 0.1
- Nano-ceramic coating, 2–5 μm thick, which can resist corrosion in salt spray tests for up to 1,000 hours
- Anti-fingerprint treatment using a special coating that repels oil and water (contact angle ≥ 110°), helping the surface stay clean
Finished Product Inspection
Before final approval, a complete quality inspection is done. Metallographic analysis is performed on samples to check the grain size of the metal, which ensures consistency. The finished liners also go through tests for hardness, strength, and fatigue (resistance to repeated use). These checks make sure that each batch meets strict quality standards.
Asamblea
Required Components
Knife assembly involves many small parts that all play important roles. These include stand-offs, ceramic balls, stop pins, pivot screws, Torx screws, different types of ball bearings, hidden pins, lock heads, thumb studs or discs, washers, wave hooks, and lockbar inserts.
Each part has a specific function that contributes to the knife’s strength, opening mechanism, or safety features.
Pre-assembly Pre-treatment
Before assembling the knife, all metal parts are carefully cleaned using ultrasonic machines and a water-based cleaner.
This removes any leftover grease or dirt from earlier processing. To prevent rust, a special anti-rust agent is applied that meets military standards.
Then, the parts are grouped and matched by size using a sorting machine. This ensures that pieces like bearings and pivot pins fit together perfectly with tiny tolerances as small as 0.005 mm.
Pivot System Assembly
Next, the pivot system is assembled. This includes installing high-quality ceramic or bronze bearings and spacers, with grease that can handle extreme temperatures.
A titanium spacer is added to match the blade’s groove and keep everything tight with a maximum space of 0.02 mm.
The pivot pin is then fastened using a torque screwdriver with very precise force. A laser is used to check alignment, making sure the pivot is centered within 0.015 mm.
Locking Mechanism Installation
Depending on the knife design, a frame lock, liner lock, button lock, or axial lock is installed.
These locking parts are made of strong materials like stainless steel and are polished for smooth contact.
Springs and push pins are tested to make sure they are strong and flexible. Lasers help calibrate the release movement of the lock, making sure it operates smoothly and safely.
Handle Integration
The handle is assembled by fastening the liners and handle scales (often made of materials like G10) using strong, hollow rivets. Riveting is done with controlled pressure to avoid damaging the materials.
The pocket clip is then attached using Torx screws and a thread locker to keep it from loosening. The clip is tested to ensure it holds tight without bending or breaking, even after thousands of uses.
Functional Debugging
After assembly, the knife goes through testing to make sure it opens and closes smoothly. Machines simulate hundreds or thousands of open/close cycles and check for any stiffness or resistance.
If there’s a problem, a small amount of special dry lubricant is added. The locking system is also tested under impact and in extreme hot and cold conditions to ensure it stays secure and reliable.
Inspección
Possible QC Defects
During inspection, quality control looks for common problems that may affect knife performance.
These include blades that are not centered, locks that move or don’t hold securely, rough spots that hurt your hand, and blades that touch the handle when closed.
Other issues include loose parts, lock sticking, or the lock not engaging fully.
Basic Structure Inspection
Inspectors check if the blade is straight and centered when opened. They use a digital tool to measure the small space between the blade and the handle. A difference of more than 0.1 mm is not allowed.
They also test how easily the knife opens and closes using a torque tool, making sure the movement feels just right and is within safe limits.
Locking Mechanism Inspection
They check how well the lock holds the blade in place. Using a magnifying tool, they make sure the lock touches at least 80% of the blade’s contact area. Then, they apply force to see if the lock holds up under pressure.
They also test for any wobbling or sliding. An impact test is done by hitting the lock to ensure it doesn’t unlock by accident. The lock should stay firm even under extra pressure.
Functionality & Durability Inspection
To make sure the knife lasts a long time, a machine opens and closes it 10,000 times. During this test, inspectors measure how much force it takes and how smooth the action is.
They also check the small detent ball that helps keep the blade closed.
It should make a consistent clicking sound and not wear out easily. All measurements are done using digital tools for accuracy.
Safety & Ergonomics Inspection
Inspectors check that the knife is safe to hold and use. They rub sandpaper on the back and edges to check for sharp burrs that could cut fingers.
Then, they hold the knife like a user would and make sure there are no uncomfortable spots that hurt the hand. To test safety, they drop the knife (with the blade closed) onto concrete three times—it must stay shut.
They also attach it to a pocket and simulate running to see if it stays closed during movement.
Surface & Weather Resistance Inspection
The knife’s surface is tested to make sure the coating stays on and doesn’t peel or scratch easily.
A machine rubs the surface many times to test for wear. The knife is also put in a salt spray chamber for 72 hours to see if it rusts.
Another test speeds up the corrosion process using chemicals. These tests help ensure the knife can handle tough weather and long-term outdoor use.
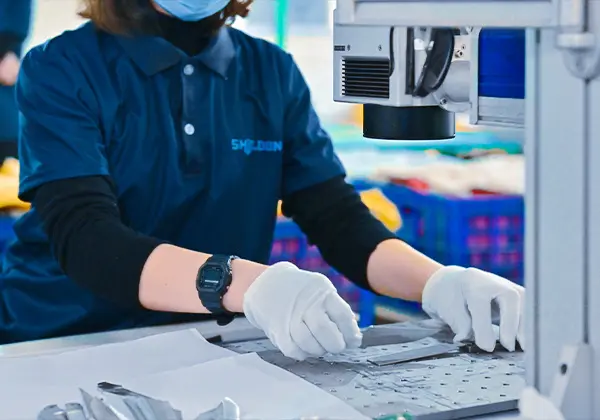
Laser Marking

Laser marking is the final step in the knife manufacturing process where important details are engraved onto the knife. These markings are done with high-precision lasers to ensure they’re permanent and look professional.
Información básica
Each knife gets important details marked on it, like the brand logo, model number, the type of steel used (for example, “CPM-S30V”), and the product name (such as “The Warrior”). These details are not placed randomly.
They follow technical drawings and specific size guidelines so everything looks clean and professional. The final look of the marking must match a sample that has already been approved to ensure consistency.
Compliance Markings
Some knives need special safety and legal markings to be sold in certain regions. For example, a CE mark shows that the product meets European safety standards.
You might also see warnings like “Keep Away from Children” to remind users that the knife is not a toy. These markings help companies follow laws and protect users.
Titanium/Stainless Steel
When marking materials like titanium or stainless steel, a fiber laser is used. This type of laser burns into the surface to create a deep, long-lasting mark—usually between 0.05 to 0.1 mm deep.
These marks are strong, won’t wear off, and are resistant to scratches and daily use.
Coated Surfaces
Some knives have colored or protective coatings on the surface. In these cases, a UV laser is used for marking.
This laser works gently and only affects the outer layer, so it doesn’t damage or remove the coating underneath. It keeps the knife looking great while still adding important markings.
Cleaning & Protective Treatment
After the knife is fully assembled and marked, it goes through a final cleaning and protection process.
This step ensures the knife is clean, safe to handle, and well-protected from rust or damage before it is packaged or shipped.
Cleaning Standard
All cleaning is done in a special cleanroom that meets the ISO Class 7 standard. This means the air is filtered so there are very few dust particles, no more than 35,200 particles per cubic meter. To make sure the knife is completely clean, a cotton swab wipe test is used.
This test follows strict FDA rules (21 CFR) to check that there’s no visible residue or dirt left on the knife after cleaning.
Short-term Protection
Once the knife is clean, it’s wrapped in VCI paper. VCI stands for Vapor Corrosion Inhibitor, which is a special material that releases protective vapor to stop rust from forming. This kind of protection lasts for about 6 months and follows military standards (MIL-PRF-3420) to ensure reliability.
Long-term Protection
For knives that will be stored for a longer time, a bio-based anti-rust oil is sprayed on the surface. This oil is free of heavy metals and meets European safety regulations (REACH compliant).
It creates a protective barrier that keeps the knife safe from rust and corrosion during storage or shipping.
Customized Packaging

Once the knife is cleaned and protected, it’s carefully packaged to keep it safe and give customers a great unboxing experience.
The packaging also includes useful tools and anti-counterfeiting features to protect the brand and the buyer.
Packaging Tiers
There are two levels of packaging depending on the product type:
- Economy Grade: This uses a strong, double-layer cardboard box (called a double-wall corrugated box). It’s FSC certified, which means the materials come from responsibly managed forests. Inside, a soft EPE liner absorbs shocks during shipping to keep the knife safe.
- Premium Grade: For high-end models, the knife comes in a sleek anodized aluminum gift box. Inside, there’s a flocked liner (soft, velvet-like material) and the box closes with a magnetic latch. This gives a more elegant and durable presentation.
Standardized Accessories
Every knife comes with essential accessories:
- User Manual: A small booklet that explains how to use and care for the knife. It’s available in multiple languages, including English, German, French, Spanish, and Japanese.
- Tool Kit: This includes a custom bit driver that matches the screws on the knife, making it easy for users to adjust or maintain their knife. A tiny syringe of grease is also included to keep the pivot smooth and prevent wear.
Anti-Counterfeiting Measures
To make sure the knife is genuine and hasn’t been tampered with, these security features are added:
- Tamper-Evident Seal: A paper seal is placed on the box. If someone opens it, the seal will show it has been broken.
- Invisible UV Code: A secret code is printed on the product that can only be seen under UV light. This helps verify that the knife is authentic and not a fake.
This stage is about carefully packing the knives, making sure all accessories are included, and labeling everything clearly so products can be traced, tracked, and shipped safely.
Packing & Label Management

Packing Process
The packing process starts after the knife passes inspection and cleaning. Each knife is placed in its protective packaging with care. The goal is to keep the knife safe during storage and shipping while maintaining its quality and presentation.
Anti-oxidation Sealing
To prevent rust or corrosion during shipping, each package includes a desiccant—a small packet that absorbs moisture. In some cases, the knife may also be vacuum-sealed to remove air from the package, giving even better protection against oxidation.
Accessory Sorting
Accessories like the user manual, warranty card, extra screws, or a tool kit are sorted and placed into specific compartments within the packaging. This keeps everything neat, avoids damage, and ensures the customer receives all necessary items with the knife.
Traceability Label
Every box gets a QR code label that includes important production details. This label stores the production batch number and the QC inspector’s ID, making it easy to trace where and when the product was made and who inspected it.
Standardized Packaging Specifications
Packaging is organized into three layers for efficiency and safety:
- The inner box holds one knife, weighs no more than 2kg, and has dimensions of 200×100×30mm.
- Ten inner boxes go into a middle box made of E-flute corrugated cardboard, which is strong enough to handle pressure up to 400kg (tested under ISTA 3A standards).
- Ten middle boxes are stacked onto a wooden pallet for transport. These pallets are fumigated and marked with the IPPC stamp to meet international shipping rules.
Smart Labeling System
A smart labeling system is used for traceability and compliance. By scanning the QR code on the label, you can access the production batch details, quality control reports, and material certificates. For air shipping, special hazard labels are added.
If the product has magnets, a “Magnetized Material” label is used, following IATA Section 902 safety standards.
Envío

This section explains how the knives are shipped to customers, including the types of transport used, required documents, and insurance options to keep shipments safe.
Upgraded Logistics Services
Knives can be shipped by air, ocean, or rail, depending on the customer’s needs. For fast delivery, air freight uses trusted carriers like DHL or FedEx with priority service. This is a door-to-door service that usually takes up to 7 days for packages over 21kg.
The shipment is kept in a controlled temperature between 15 and 25 degrees Celsius to protect the product. For larger shipments, ocean freight options include full containers (FCL) or smaller shared shipments (LCL).
These can be sent with delivery terms like DDP (Delivered Duty Paid) or DAP (Delivered at Place), meaning the seller takes care of taxes and duties or just delivery to the destination.
Another option is rail freight via the China-Europe Railway route, which takes about 18 days from Xi’an to Hamburg and includes real-time GPS tracking for shipment monitoring.
Customs Documentation Package
Every shipment needs important documents to clear customs smoothly. These include:
- commercial invoice (shows the sale details),
- a packing list (details of what’s inside the shipment),
- a Certificate of Origin (COO) proving where the goods are made,
- and a Material Safety Data Sheet (MSDS) explaining any safety info about the materials.
Optional documents like an EU CE Declaration of Conformity or a US FCC Compliance Statement may also be included depending on the destination country’s rules.
Insurance Options
Insurance helps protect the shipment during transport.
The basic insurance covers 110% of the shipment’s value under CIF (Cost, Insurance, and Freight) terms, protecting against common transport risks like damage or loss.
For regions with higher risks, such as the Middle East or Latin America, there’s an option for special insurance that covers war risk and strike risk, providing extra security for the shipment.
Environmental & Sustainability Statement
This section explains how the company cares for the environment and promotes responsible business practices.
Wastewater Collection & Treatment
All wastewater from cutting and machining processes is carefully treated before release.
Cutting fluids used in CNC machines go through special treatments like demulsification (separating oils from water) and biological processing to meet strict Chinese water discharge standards (GB8978).
In heat treatment workshops, harmful gases are cleaned using activated carbon filters and catalytic combustion systems that meet EPA regulations, ensuring pollution is minimized.
Full Supply Chain Environmental Certification
The company works to reduce waste and use eco-friendly materials. For example, packaging plastics are kept below 5% of the total materials, and most packaging uses recyclable materials like honeycomb paper instead of foam.
Each shipment also comes with a Carbon Footprint Report that shows how much carbon dioxide (CO₂) emissions were produced during transportation, helping track and reduce environmental impact.
Corporate Social Responsibility Disclosure
The company follows fair and ethical labor practices and has SA8000 certification, which means it respects workers’ rights, fair wages, and working hours.
It also commits to ethical sourcing by ensuring no conflict minerals like tantalum or tin from conflict zones in the Democratic Republic of Congo (DRC) are used in any products.


